Archive

sailing


untitled-39

It took about 30 hours of sanding and painting to refinish Rainbird’s hull.

Over the last 30 years I’ve painted several large wooden boats. If you haven’t done it before it can seem a daunting task, but as I will explain here, with some careful planning it can be done successfully with minimal equipment and materials costs. By painting, I mean good technique with roller and brush and not spray painting – a more demanding and costly alternative. You will need to adapt the materials and techniques to whatever you have available in your part of the world.

The best paint systems – in terms of durability – are two part polyurethanes. Unfortunately, for the boat owner operating on a tight budget they are usually out of the question unless you have the well-controlled conditions needed to spray them. Many years ago I did paint a 36’ catamaran with a two-part system, using a roller and brush but it was difficult and stressful and I wasn’t entirely happy with the results. Two of us worked outdoors and by luck, it happened during a wonderful break in the weather but I would not risk it again.

The last boat I painted, Rainbird, a 33 foot Bill Garden sloop, was prepped and painted, single handed, in a week. It was hard, dusty work but my timing, weather wise, was good. I had Rainbird hauled out at Maple Bay on the east side of Vancouver Island, at a yard that allows owners to work on their boats. Historically this time of year is often sunny but not too warm – perfect for hours of sanding and applying paint.

Rainbird had been painted by the previous owners with a single-part Z-Spar yacht enamel approximately ten years earlier. Her red cedar, cold-molded hull was epoxy coated but not sheathed. The teal blue paint had turned very chalky. There were a few cracks in the paint and some minor peeling but the overall the integrity was good. All it needed was sanding and some minor repairs before applying a fresh coat of paint.

The yard kindly lent me some boards and supports to build a scaffold. I hooked up my orbital sander to a vacuum cleaner and set to work. It was hard, dusty work and I was happy that I could use the marina’s showers at the end of each day. I just worked my way around the boat, with two random orbital sanders, one with 80 grit and the other with 120 for finishing. I believe I used around 70 of the Velcro type sanding pads. This is a big boat and yes, if you looked closely at the finished job you might see swirls from the sanders – I didn’t have the time or energy to go for a perfect finish. I just needed a finish that would adhere well and last for another ten years.

Once I had thoroughly sanded the hull I washed it down with fresh water and dried it with clean cloths to remove the last traces of paint dust.
untitled-15.jpg

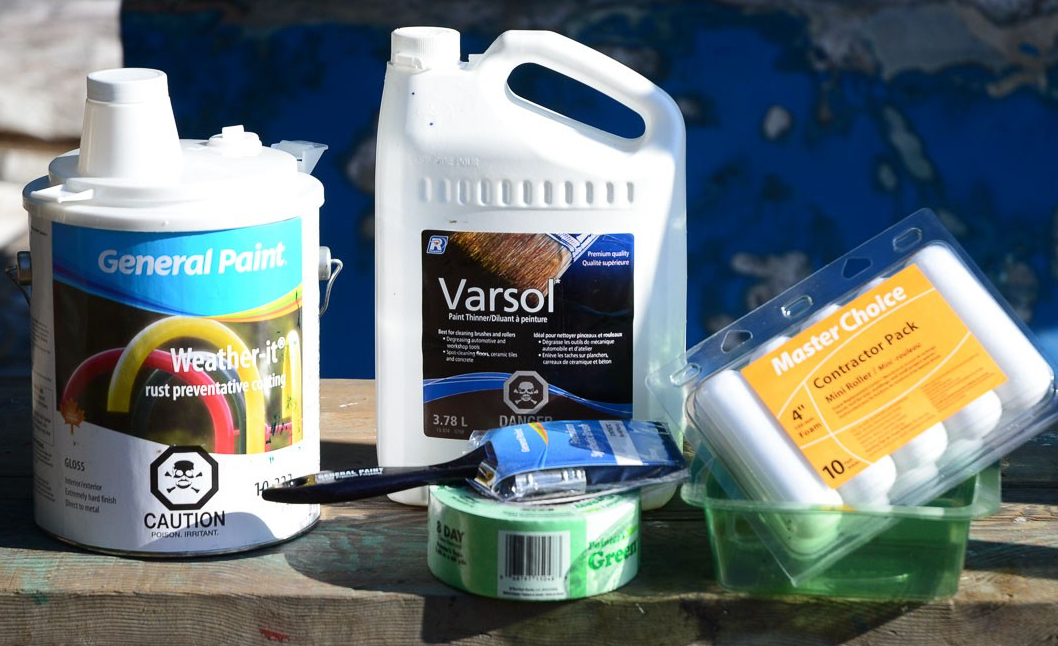
Some of the essentials.

The late summer mornings were damp so I would wipe away condensation prior to painting. The boat was oriented north/south so I only painted the side out of the sun. I  painted a whole side without stopping to avoid an unsightly overlap.

I had painted Rainbird’s decks and cabin with General Paint’s Weather-it three years earlier and was very happy with the results. It was easy to apply and still looked as good as new. The paint was intended for commercial steel work and as Rainbird’s cold-molded hull was unlikely to move much I felt this paint would be a good match. It was also considerably cheaper than yacht enamel.

I bought some brushing thinners and a quality 3” brush. I would apply the paint with a 4” roller and then “tip off” the freshly laid paint with the brush. I always had a second brush at hand incase the first became contaminated.

untitled-13

With the sanding complete it’s time to start painting.

Painting a side took about 3 hours. I would apply a vertical panel of paint about 18” wide with the roller and then “tip-off” with the brush. Speed is essential because you need to maintain the wet edge. Having a second pair of hands would have been very useful because one could apply paint with the roller while the other “tips-off”. You will probably need a brushing thinner – the exact amount depends on how fast you are working as well as temperature, humidity and wind.

Luckily the wind (and bugs) held off and the daytime high stayed below 20C. The first coat looked fantastic. I was planning a second coat but the weather broke. Unfortunately, I needed to return home and yard fees together with the prospect of fall weather didn’t make a holding-off for a second coat practical.

I dodged showers while antifouling and doing some mechanical work. Rainbird went back into the water ten days after she was hauled. I was very happy with her new paint job.

********

If you enjoy my blog you might like to read about my sailing adventure on the west coast of Britain. “Suilven’s Travels” tells how I sold my home and with my partner Jill Brown, built a 26′ Wharram catamaran which we sailed around the coasts of England, Wales, Scotland and Ireland. “Suilven’s Travels” is available as an ebook for $4.99 on Amazon and the proceeds help support this blog.


Skye Five-4

Patrick tries the long-arm scraper with steel blade.

If you own a boat for long enough you may be faced with one of the most daunting challenges a DIY boat owner can have… stripping old, cracked and peeling antifouling back to a bare hull.

My time was up this spring. I knew it was coming and after Karen and I purchased a C&C 30 last fall we realised this job was looming on the horizon. During the pre-purchase haul-out and survey it was clear that the task was imminent. She’s a fine, strong boat and the price was right so we decided to bite the bullet and get on with it.

I spent some time researching “how to,” and of course there are plenty of opinions and advice on various forums. But it’s difficult to separate the opinions from the raw “truth.”

Big factors will be time and money. You will probably have one or the other and if you have both then count yourself as being very, very lucky but even then care is needed. Avoiding charlatans, gimmicks and rash promises can be tricky. And even with all the money in the world you may be unable to nail down a reliable shipwright or out-of-work yacht bum to do the grunt work – especially in the spring when they are in peak demand. If you are flush with cash then this is probably not for you anyway as you probably have a spanking new boat that won’t need serious bottom work for many years to come.

Skye Five spent the winter in Captain’s Cove Marina in Ladner, BC. The Marina allows owners to freely work on their own boats. Skye Five was hauled on the 15th March and I decided to rent the yard’s pressure washer to clean the weed off. Lucky I did, as I discovered that if I held the nozzle close enough, not only did the weed and barnacles come off but large slabs of old antifouling too. With the yard’s approval, I continued for 3 hours with only a five-minute break to put more gas in the machine. My shoulders and arms were killing me after grappling with the writhing hose but at the end of it I figured I had removed 60 – 70% of the horrid stuff without getting much on myself. I had clogged the drains but I felt victorious. The yard manager was pretty amazed too.

Skye Five-2

Pressure washing removed a lot of loose antifouling.

The euphoria was short lived, however, as I began to tackle the remaining 30 – 40% the following day. I had help. Karen’s son Patrick used a day off work. Little did he know what he might be getting in to. Between the two of us we spent an exhausting 16 hours attacking the bottom, armed to the teeth with various scrapers. These fell into two camps. The very long handled variety with steel blades – very effective but the blades required sharpening every 10 minutes. The other, somewhat shorter scraper came with a reversible tungsten carbide blade. I used two carbide blades for the whole project, eventually abandoning the steel scrapers.

Twenty-five hours of back breaking, shoulder burning work was needed to get the hull ready for final sanding. I’m nudging 60 and starting to feel it. Young studs may not be so challenged. It’s filthy, hot work. You need all the protective gear – goggles, dust masks, safety glasses, hazmat suit (well, painter’s coveralls). It then took 10 hours of sanding to prepare for paint. Eighty grit worked the best. The dust was extraordinarily obnoxious and had a tendency to find its way into everything. You have to “decontaminate” at the end of each session to avoid the worst. Once kitted up I would work non-stop for 3-4 hours because I just didn’t want to go through the rigmarole of getting the gear on and off.

Fortunately, the weather was unbelievably benevolent for Vancouver and I had five days of sunshine and temperatures in the low teens – perfect!

So, after 37 hours of probably the most grueling work I have ever done, I stepped back to admire a job well done.

Was it worth it? Are there better or cheaper alternatives? Well I did look into using paint stripper. There are some soy based products out there but none I could find in Vancouver. I could have brought some in from the USA but I had left it too late.

As for materials, the cost of 40 sanding discs and 3 scrapers hardly touched $100. Paint stripper would have been way more expensive and I still would have needed to sand the hull.

The yard also warned not to use soy based stripper if the temperature was below 20C. They had seen expensive failures last year using a soy based system – the weather was too cold and a second application, applied by a contractor at extra cost was needed. I was told that if conditions are right it works well.

Web searches showed some pretty mixed reviews on all types of paint stripper. There are blasting options but these are not generally DIY and therefore expensive.

I could have just sanded, preferably vacuum sanding, but I’m not sure that would have been any faster. You also need to apply a lot of pressure for rapid removal and believe me, that is not easy when working above your head, sometimes crouched, sometimes kneeling and sometimes sitting. Given the pain it was definitely a case of “mind over matter.” At the end of it I gave myself a pat on my very sore back as I had endured way more discomfort than I ever knew was possible.

The other really, really big consideration is the impact of the dust created using scraping and sanding. The yard, quite rightly, insisted that I tarp the hull off to contain the dust. A roll of construction plastic and some Tuc tape worked very well and I did manage to remove the tape without leaving a lot of goo on the boat. There was very little wind which helped keep the dust in one place. The last thing the yard wanted was a fine red film on freshly detailed boats. I think I met their requirements – at least there were no complaints.

Skye Five-6

Almost done! The tent contains the nasty red stuff.

Well, it took 37 hours of scraping and sanding. If I hadn’t struck it lucky with the pressure washer it would have taken considerably longer. It’s probably the cheapest way to do the job by far – if you are providing your own labour. Also be realistic about the length of time it’s going to require. Yard space is not cheap. Keep in mind that if you start out scraping you can switch to another method if it doesn’t work for you.

It’s just starting to rain so the new antifouling will have to wait. Right now I’m heading off for a well-earned beer.

During a recent visit to the Fowey, Cornwall – the south western peninsular of the UK – I came across this gorgeous cutter. Unfortunately I don’t have any details (no name visible from the dock) and no one was available for comment. Maybe someone out there knows more..? It took my breath away!

Seen in Fowey, UK, May 2015

Seen in Fowey, UK, May 2015

UK2015-161

UK2015-158

Also seen entering the harbour – a restored working boat no doubt.

UK2015-151